header picture
Showing posts with label Cooking with kids. Show all posts

Monday, December 1, 2008

Cooking with Kids: “Feast Lesson”


Once a week I take my son, who is 5 years old, to do the grocery shopping with me. It’s a lot of fun (but wasn’t always like that). I love to see how his interest and excitement about food grows and grows. This of course, doesn’t mean that he is not a picky eater. But that’s OK; I used to be one too as a child and grew out of it. So parents, don’t despair. But I digress, like I always do.

We went shopping together three days before Thanksgiving. We got all excited by the atmosphere at the store; you know… the decorations, the music, but mostly by the bounty of seasonal vegetables and fruits. Wow. I love winter vegetables! And spring, summer and fall too. For some reason, my little boy was particularly enthusiastic, maybe because of all the food I put in our cart – I did get carried away a bit, ahem hhhm, OK, a lot – and me talking about all the delicious meals we are going to have over the weekend and so he asked me to give him a “feast lesson”. Oh, this child makes my heart want to pop out of my chest sometimes. Makes me want to squeeze him.


Well, he didn’t get a “feast lesson”, but I did let him (or did I make him? I guess it depends on how you look at it) help me make one outrageously delicious cornbread stuffing.


So far I have posted about baking with kids because it’s my husband who usually does the cooking with kids. I used to think it is the proximity to fire and knives that made me choose baking over cooking with my kid. The more I thought about it I came to the conclusion that when I bake I am more relaxed, but when I cook the tyrant, control freak, bossy side of me comes out. This is why I prefer to be in the kitchen alone. I’m not a friendly cook. I need to work on that. When people pay me to cook for them I’m nicer though.

Anyway, this Thanksgiving I wasn’t stressed. We had guests coming over and everyone got a task and a dish to bring that I have delegated to them so I had time to try out the “cooking with your kids” thing.
It was nice.

This is how my son, the lucky little angel, got the short version of a “feast lesson”. I showed him how I want the celery, apples, cornbread, and leftover corn muffins chopped. Then I showed him how to whip heavy whipped cream that I used for the pumpkin pie (see tips in A cake for the weekend: Amazing strawberry shortcake post). I don't let him handle the mixer by himself, of course.


And then we set the table together for the “feast”.


Here are a few “How-to” for making cooking with your kids more fun and safe (but not a complete list):

* Set a “station” where s/he can work, clean and clear from clutter.
* Secure the cutting board to the work surface by placing a plastic mat or wet towel/paper towel so it doesn’t slip.
* My son is using a regular serrated kitchen knife since he was 3 years old, not a plastic knife, but I’ll leave that to your judgment with your own kids.
* Washing hands is the first thing to do.
* Wearing an apron is encouraged but optional, depends on the expected level of mess and spill.

For more tips, see the related posts below:
Baking with kids: Chocolate-banana cookies, recreating the magic

Baking with kids: Chocolate cookies

A cake for the weekend: Sour Cream Coffee Cake

Why should you cook with your kids?

PS - I don’t mean to preach to you or anything like that. But I would like to encourage you to spend time in the kitchen with your kids and teach them cooking and baking skills. I wrote many times before that it wasn’t always easy and fun to cook with my son when he was younger. I constantly plan to post about all the difficulties I/we had when we began two years ago. Now, two years later we are smarter so it looks better in the pictures, but believe me, many cooking sessions have ended before they began a year and two years ago.

I would like you to share here (in the comments section below): Do you cook or bake with your kids? Would you like to do it? Do you have any advice, tip or story to share? I'm no expert and would love to hear from you.

Nurit

Sunday, November 30, 2008

Holiday Gift Ideas for Kids Who Cook


When my son was 3 years old, he got a Home depot tool box from Toys R Us for his birthday. That was one of the best gifts ever. He played with it a lot, by himself or when he was “helping” his dad build things. It was a wonderful imaginary toy as well as a “useful” one with context to real world activities.
Now that he is 5 and he wants real tools.
I think that in general, if there’s no safety issue, real tools are better choices then toy tools. Kids know the difference. I believe they want to do the real thing. (But I’m no child education expert, so… maybe you know better. This is only my opinion).
When it comes to cooking, he got his own little toy kitchen and kitchen tools at about that same age (3 years). He plays with it from time to time. However, I think that he has more fun when we do actual cooking or baking together in the kitchen while using real kitchen equipment.


Corky Pollan from the online Gourmet magazine , November 2008 issue, (Photographs by Romulo Yanes) shows a few examples of really cool kitchen tools you can give to your kid/s who likes to cook. They are real but they are more colorful and fun looking then “adults” tools which are usually a boring black and white. So if you want to encourage your child/ren to play in the kitchen with you, this might be a cool gift to give for the holiday.
Most of the tools can be found at familiar stores like Target, Bed Bath and Beyond, Crate and Barrel, and others.


Another idea which costs nothing but some of your time is – give your child a cooking lesson!
Teaching them a life skill is the most precious gift. I think.
It doesn’t have to be complex. Keep it simple, depending on their level of skills and age and time available. A few examples: baking cookies, making a salad, setting the table, making soup, whatever will be fun for you.


Have fun. Play.
Nurit

Tuesday, November 11, 2008

Baking with kids: Chocolate-banana cookies, recreating the magic – Part I


A while ago I bragged about how my son, who is 5 years old, wrote a recipe for Chocolate-banana cookies. A recipe! From scratch! All by himself! And no one asked him too.

He made mommy, that’s me, very proud, of course.
That was in September (2008) and I have finally found the time to share with you some tips on how we do it. I’ll tell you right now, it wasn’t always fun to bake or cook together – we started when he was about 3 – but more about that later.

Today I want to share with you some secrets and photos from behind the scene. The timing is perfect because cookie season is about to start and a lot of holiday cookie baking is going to take place in many homes. People are already excited about it, for example, check out the cakespy.com blog, but don’t participate in the poll because I did and I want to win. If you participate it will lower my chances to win one of the cool prizes. I’m just kidding. You know that. Right?!
So, anyway, back to baking with your kid/s.

First, here is the recipe.


The recipe is written in Hebrew. He wrote the title - Chocolate banana cookies. The ingredients: flour, sugar, eggs, butter, salt, bananas, chocolate, etc. The quantities, well, mainly in “scoops”, a somewhat vague measuring unit, but this is how they talked about it in his former class when they were sharing and passing lunch around the table. Some quantities are in teaspoons and cups. So here comes an important point: I had to figure out how much to let him do what he wants (and maybe fail), and how much to intervene and give him advice (so he has a better chance to succeed)?

I wanted to recipe to be his, not mine.
I knew that some of the quantities just won’t work. For example, any adult can tell in advance, a baker or not – that 3 teaspoons of flour are not enough to make cookies. So we had a long discussion to figure out what is exactly a “scoop” and looked at other recipes for advice. We have also agreed to adjust the quantities as we go along and added more and more and more flour to the mixer bowl until the consistency looked OK, a total of 2 ½ cups of flour.

So as you can see, there is a fine line between how much the child leads the process and how much you are in charge. When we just started baking together, about 2 years ago, I was more in charge and he had to work on his listening skills and follow my instructions. A few times I had to end up the process because it turned into a battle. Not fun. But today when he has already learned how to work, I can give him more freedom.

In this project he had a lot of freedom to lead, but that is after 2 years of experience.

I learned a lot too. The 2 most important things are, I think:

1. Forget about perfection. It’s not going to be the same as if you did it by yourself. Yep. And not as much fun either as spending the time and doing this project together with your kid/s, and also giving them important life skills.

2. Loosen up. It’s OK to make a mess. This is how they learn. Their motor skills will get better as they grow. You can clean up later together.

Now let's move forward.

First, we wash our hands (there is a potential for the first battle right there), and prepare the "mise en place", or gathering and preparing all the ingredients and tools you are going to need at your work station, as well as reading the recipe.


Learning about measuring cups and spoons is a great way to teach fractions, and math in general.


Peeling fruit is great to develop motor skills. Of course for a kindergartener it’s not hard to do, but little ones can feel a great sense of accomplishment by doing it.


… as well as mashing the fruit...


more peeling to do...


and measuring...


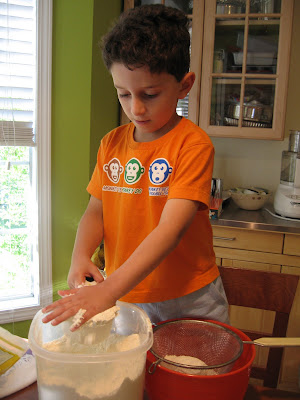
Sifting the dry ingredients can make a mess when their fine motor skills are not yet fully developed. You can have flour all over the floor, so stand next to them and guide/help them.


Scooping is a bit tricky. I usually scoop the batter out from the bowl with the cookie scooper and let him drop it on the baking sheet.


Have fun.
Nurit

Saturday, September 20, 2008

Baking with kids: Chocolate-banana cookies


My son (5 years old) wrote a recipe. He did all by himself. I’m so proud and happy.
That’s’ the recipe:

Don’t try to read it, it is written in another language, but he also drew pictures of the ingredients and specified the quantities (some in cups, some in teaspoons, and some in “scoops”).

That’s the photo he took after styling the cookies himself:


By the way, thank you to Danny for his post: 5 Tips To Take Your Food Photographs From Boring to Fabulous! I’m practicing.

It’s 12:02 AM! Got to go and sleep. But the recipe will be shared. Stay tuned!
;-)

Other related posts:

Baking with kids: Chocolate cookies

Tuesday, September 9, 2008

Baking with kids: Chocolate cookies

Bellevue school teachers are still on strike.
Since we have already had most of our adventures during August, baking cookies with my 5 years old seemed like a nice little project to pass the afternoon today.


Putting butter in mixer bowl:


Measuring flour:


What is a “teaspoon”?


Sifting dry ingredients:


Adding eggs to batter :

Measuring ¾ cup of chocolate chips:

Scooping the batter with cookie measuring spoon and placing on baking sheet. (I did most of the scooping. He likes to play with the spoon and release the batter on the baking sheet. )


Clean up time (OK, I did tell him he will get 2 quarters for sweeping the floor):


Baby gets training on how to clean the floor. She needs to learn this job too (for the future… :))


All done. That was fun.


Tip: when baking, or cooking, with kids, forget about perfectionism. Of course teach the child/ren how to do things, but bite your tongue when things don’t turn out the exact way you want them to be. For example, when the shape of the bread is not as perfect as it would have been if you did it… ha ha ha.


Have fun!

Friday, August 22, 2008

A cake for the weekend: Sour Cream Coffee Cake

Copyright 2001, Barefoot Contessa Parties!, All Rights Reserved.
Click here for the recipe on the food network web site.

For the cake:
12 tablespoons (1 1/2 sticks) unsalted butter at room temperature
1 1/2 cups granulated sugar
3 extra-large eggs at room temperature
1 1/2 teaspoons vanilla extract
1 1/4 cups sour cream
2 1/4 cups all purpose flour
1/4 cup cornstarch
2 teaspoons baking powder
1/2 teaspoon baking soda
1/2 teaspoon kosher salt

For the streusel:
1/4 cup light brown sugar, packed
1/2 cup all-purpose flour
1 1/2 teaspoons ground cinnamon
1/4 teaspoon kosher salt
3 tablespoons cold unsalted butter, cut into pieces
3/4 cup chopped walnuts, optional

Preheat the oven to 350 degrees F. Grease and flour a 10-inch Bundt/tube pan.
Cream the butter and sugar in the bowl of an electric mixer fitted with the paddle attachment for 4 to 5 minutes, until light. Add the eggs 1 at a time, then add the vanilla and sour cream. In a separate bowl, sift together the flour, baking powder, baking soda, and salt. With the mixer on low, add the flour mixture to the batter until just combined. Finish stirring with a spatula to be sure the batter is completely mixed.

For the streusel, place the brown sugar, flour, cinnamon, salt, and butter in a bowl and pinch together with your fingers until it forms a crumble. Mix in the walnuts, if desired.
Spoon half the batter into the pan and spread it out with a knife. Sprinkle with 3/4 cup streusel. Spoon the rest of the batter in the pan, spread it out, and scatter the remaining streusel on top. Bake for 50 to 60 minutes, until a cake tester comes out clean.
Let cool on a wire rack for at least 30 minutes. Carefully transfer the cake, streusel side up, onto a serving plate.

My comment on the recipe: I omitted the sugary glaze topping. I always think of that topping as unnecessary. It doesn’t add any flavor really, and it’s like eating sugar, yuck, and consuming more unwanted calories.


Bake with your kids.
I made this cake with my son (5 years old). It was a lot of fun.
Kids can measure ingredients, pour dry ingredients, sift the dry ingredients, crack the eggs, turn the mixer on/off (of course, you need to make the rules and explain about safety, stand next to them, and watch them!), and make the streusel. If they like a little mess, and you don’t mind it either, let them butter and flour the pan.

Enjoy the weekend,
Nurit

More cakes:
Orange Hazelnut Honey Cake
Black Forest Chocolate Roulade
Crostata with Summer Fruit
Blueberry crumb cake

Monday, August 11, 2008

Cookies for the weekend: White and dark chocolate chunk cookies - fun to do with kids

This was a fun and very easy project to do with my son (5 years old) on a Sunday afternoon.
The recipe is from one of my favorite cookbooks “Wolfgang Puck Makes It Easy”, and it is dedicate to my friend, Sharon, who checks my blog every day, and who told me that I inspire her to start cooking and baking which she rarely did before.

Makes about 40 cookies.
(Use chips if you don’t have bars of chocolate).

6 oz. bittersweet chocolate
4 oz. white chocolate
1 ¾ cups all-purpose flour
½ teaspoon baking soda
¼ teaspoon salt
1 stick unsalted butter, cut into ½-inch pieces
½ cup sugar
1/3 cup packed light brown sugar
1 large egg
1 teaspoon vanilla extract

Cut chocolate to ¼ - ½-inch pieces. Set aside.
Sift flour, baking soda, and salt. Set aside.
In a mixer with paddle attachment, cream the butter until fluffy, about 2 minutes. Scrape sides of the bowl. Add sugars and beat 1-2 minutes. Add egg and vanilla and beat until incorporated.
Gradually add the flour (on low speed). Add chocolate and beat just until incorporated.
Place 2 pieces of parchment/wax paper on work surface. Scoop dough to make 2 logs about 2 inches in diameter on each paper. Keep them rolled in the parchment and refrigerate for 2 hours (we went to the park), and for as long as a week.
Preheat oven to 350 degrees. Line 1-2 baking sheets with parchment paper.
Cut logs into slices ¼-inch thick. Place cookies about 1 inch apart on the baking sheets. Bake for 10-12 minutes, reversing the pans front to back halfway (and up/down if using 2 baking sheets in the oven at the same time).
The cookies are done when they are brown around the edges and on the bottom (lift one with a spatula to check). Remove from oven and cool on a rack, or just slide parchment off onto surface for the cookies to cool.

Bake with your kids.
Kids can: sift flour, measure ingredients, mix, look what’s going on inside the mixer 9stand next to them and explain about safety), make logs, arrange cookies on baking sheet. And of course, EAT THE COOKIES, you little cookie monsters.

Have fun!
Nurit

Friday, July 25, 2008

Chicken thighs, Israeli couscous, steamed cauliflower, and salad with feta


This dinner can be prepared in 20 minutes if you are quick and efficient in the kitchen.
If you are not, you know what I say: 1) take a cooking class, and 2) the more you cook, the better you get.

Makes 4-6 servings

For the chicken:
4-6 boneless skinless chicken thighs
1 teaspoon paprika
1 teaspoon cumin
1 teaspoon Shawarma seasoning, optional (available at Mediterranean stores. Or use more cumin, turmeric, and thyme)
Salt
Pepper
Evoo (extra virgin olive oil)

Rub chicken with spices, salt, pepper and a drizzle of evoo.
Reheat 10-12’’ stainless steel skillet over medium heat. Sear one side of chicken for about 4 minutes until browned, turn on the other side and sear another 4 minutes. Turn heat to medium-low, turn from side to side every few minutes until done. It will take about 20 minutes or so. (You can also grill the chicken).

For the Israeli couscous:
1 tablespoon Evoo (extra virgin olive oil)
1 tablespoon butter
¼ cup onion, minced
1 box Israeli couscous
1 teaspoon salt
2 cups boiling water

In a small pot, sauté the onion with evoo and butter until translucent and soft. Add couscous, salt, and boiling water. Mix and cover the pot. Cook over low heat 8-10 minutes until al dente.

For steamed cauliflower:
1 medium size cauliflower, cut to florets
Salt
1 garlic clove, whole, slightly crushed, optional
3 sprigs thyme, optional

In a small steaming pot add 2’’ water, and garlic and thyme, if using. Bring to boil. Put the cauliflower in the steam basket, salt lightly, cover and cook about 8 minutes (I forgot to measure the time. I think this is what it took).

Salad with feta:
See “Simplest salad” + add crumbled feta.

Cook with your kids.
Kids can: gather ingredients from pantry, make salad (young children can use plastic knife), sprinkle salt and pepper, ground the black pepper, pick herbs from pot (or use small scissors), drizzle olive oil.

Enjoy.
Nurit

Thursday, July 17, 2008

Why should you cook with your kids?


Why should you?

First, your kid/s won’t be able to say “my mom/dad didn’t teach me how to cook”!

Also, Because your child/ren will…

* Learn real life skills
* Get a sense of accomplishment and feeling good about themselves
* Learn how to follow instructions and family rules (like washing hands before cooking, cleaning up, etc)
* Improve their organization skills
* Learn math – Introduce real-life math applications, addition, fractions, etc
* Practice spontaneous reading – what’s in the recipe, what is written on food packages, etc
* Learn to appreciate good food, establish good habits for the future
* Learn about food of other cultures

And above all, you get to spend quality family time. It is a wonderful bonding opportunity. Really, I'm not kidding. So, loosen up about having a spotless kitchen (I know it’s hard), and have fun! Play!

Tip: Do this when you are relaxed and have time, like during the weekend.